White Chocolate-Covered Strawberries with Decorative Semisweet Chocolate Lines Recipe
Introduction
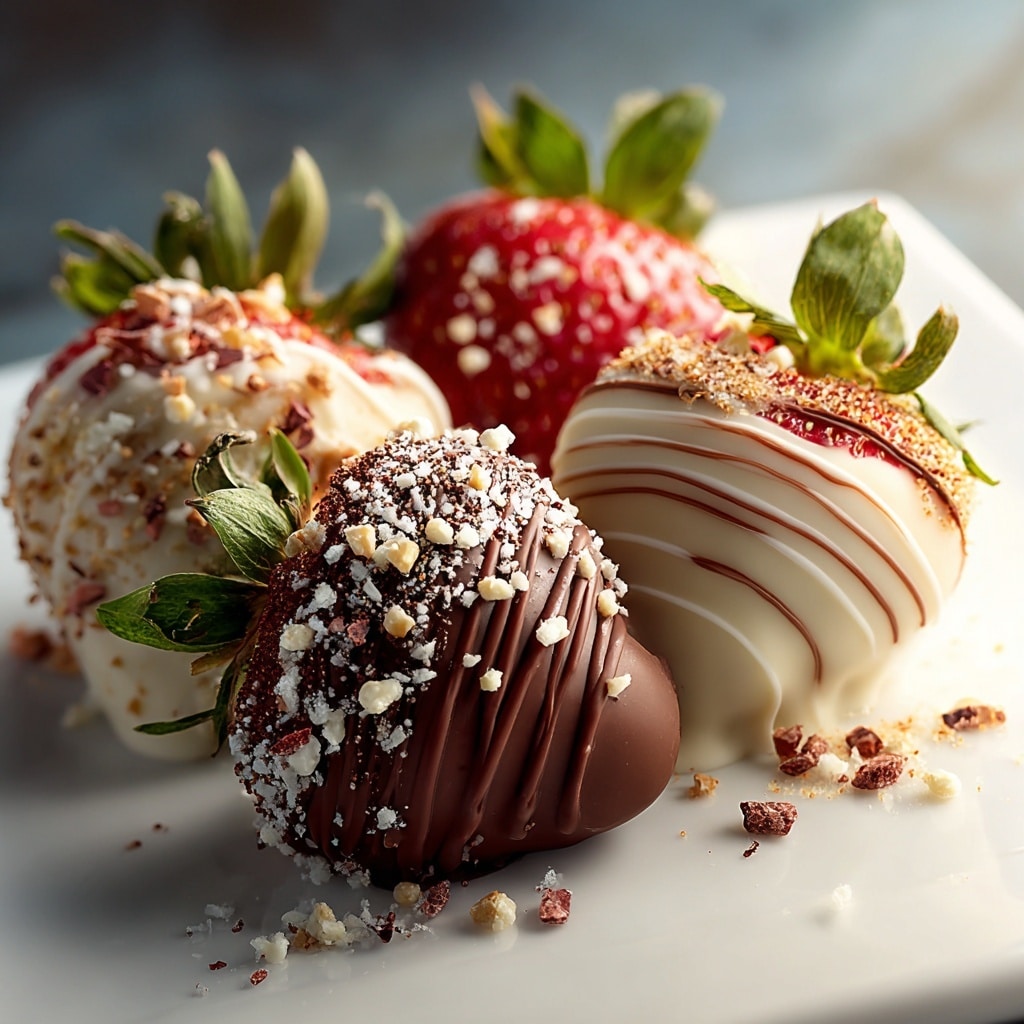
White chocolate-covered strawberries are an elegant and delicious treat perfect for any occasion. These berries are coated in smooth white chocolate and decorated with delicate semisweet chocolate patterns, making them as beautiful as they are tasty.
Ingredients
- 1 lb. strawberries (about 25 berries), room temperature
- 1 oz. semisweet chocolate chips, finely chopped
- 2 1/2 tsp. vegetable shortening, divided
- 8 oz. white chocolate chips, finely chopped
- Parchment paper
- 50 toothpicks
- Tall cup filled with warm water
- Piping bag or ziplock bag
Instructions
- Step 1: Wash and completely dry the strawberries, as any residual water will prevent the chocolate from setting properly. Insert a toothpick into the center of the green stem at the top and push it 3/4 of the way through toward the base of the berry.
- Step 2: Place the chopped semisweet chocolate in a small microwave-safe bowl with 1/2 teaspoon vegetable shortening. Microwave for 30 seconds on 30% power, stir well, and repeat until fully melted and smooth. If small lumps remain, microwave for an additional 15 seconds at 30% power.
- Step 3: Spoon the melted semisweet chocolate into an uncut piping bag, seal it, and place it in a cup of warm water while melting the white chocolate.
- Step 4: In another microwave-safe bowl, combine the chopped white chocolate with the remaining 2 teaspoons vegetable shortening. Microwave for 30 seconds on 30% power, stir, and repeat until melted and smooth. Reduce the final microwave time to 15 seconds if only a few lumps remain.
- Step 5: Remove the piping bag of semisweet chocolate from the warm water, dry its outside thoroughly, and cut a small opening at the tip.
- Step 6: Holding a strawberry by the toothpick, dip it almost to the top into the melted white chocolate, swirling to coat evenly. Let the excess chocolate drip off.
- Step 7: Over parchment paper, hold the dipped strawberry horizontally with your non-dominant hand. Using your dominant hand, pipe 4-5 thin parallel lines of semisweet chocolate across the width of the berry, covering one side only.
- Step 8: Set down the piping bag and take a clean toothpick. Drag it gently down the face of the berry perpendicular to the semisweet lines to create a toothed pattern. Repeat several times across the berry.
- Step 9: Place the decorated strawberry on the parchment paper with the patterned side facing up. Repeat the process with the remaining strawberries.
- Step 10: Allow the chocolate to harden completely before serving, about 30 minutes.
Tips & Variations
- Use room temperature strawberries to help the chocolate adhere better and prevent condensation.
- If you don’t have a piping bag, a small ziplock bag with a tiny corner cut off works well for piping chocolate.
- Try adding a sprinkle of finely chopped nuts or edible glitter to the white chocolate before it sets for a festive touch.
- For a different flavor, substitute the semisweet chocolate drizzle with dark or milk chocolate.
Storage
Store the decorated strawberries in a single layer in an airtight container in the refrigerator. They are best enjoyed within 24 hours for optimal freshness. To serve, let them sit at room temperature for about 10 minutes to improve flavor and texture. Avoid freezing, as this can affect the texture of the berries and chocolate.
How to Serve
Serve this delicious recipe with your favorite sides.
FAQs
Can I use frozen strawberries for this recipe?
Frozen strawberries are not recommended because they release moisture when thawed, which can prevent the chocolate from setting properly and make the berries soggy.
How can I prevent the chocolate from seizing when melting?
Make sure to chop the chocolate finely and use short bursts of low-power microwaving, stirring well between intervals. Adding vegetable shortening helps create a smooth, glossy finish and reduces the risk of seizing.
PrintWhite Chocolate-Covered Strawberries with Decorative Semisweet Chocolate Lines Recipe

Delight in these elegant White Chocolate-Covered Strawberries, featuring juicy fresh berries dipped in smooth white chocolate and decorated with a delicate semisweet chocolate toothed pattern. Perfect for special occasions or as a decadent yet simple treat.
- Prep Time: 15 minutes
- Cook Time: 10 minutes
- Total Time: 45 minutes
- Yield: About 25 decorated strawberries 1x
- Category: Dessert
- Method: No-Cook
- Cuisine: American
- Diet: Vegetarian
Ingredients
Strawberries
- 1 lb. strawberries (about 25 berries), room temperature
Chocolate Coating
- 1 oz. semisweet chocolate chips, finely chopped
- 2 1/2 tsp. vegetable shortening, divided
- 8 oz. white chocolate chips, finely chopped
Other
- Parchment paper
- 50 toothpicks
- Tall cup filled with warm water
- Piping bag or ziplock bag
Instructions
- Prepare Strawberries: Wash the strawberries thoroughly and dry completely, as any residual moisture will prevent the chocolate from setting properly. Insert a toothpick into the center of the green stem and push it about 3/4 of the way through to the base of each berry.
- Melt Semisweet Chocolate: In a small microwave-safe bowl, combine chopped semisweet chocolate chips with 1/2 teaspoon vegetable shortening. Microwave on 30% power for 30 seconds, then stir. Repeat heating and stirring until the chocolate is fully melted and smooth, reducing the final microwave interval to 15 seconds if only a few lumps remain.
- Prepare Semisweet Chocolate Bag: Spoon the melted semisweet chocolate into an uncut piping or ziplock bag. Seal the bag tightly and place it upright in a cup filled with warm water to keep the chocolate melted while you melt the white chocolate.
- Melt White Chocolate: In a separate microwave-safe bowl, combine chopped white chocolate chips with the remaining 2 teaspoons of vegetable shortening. Microwave at 30% power for 30 seconds and stir. Continue microwaving and stirring, reducing the final interval to 15 seconds if small lumps persist, until smooth and fully melted.
- Pipe Semisweet Chocolate Details: Remove the piping bag of semisweet chocolate from the warm water and dry the outside thoroughly. Cut a small opening at the tip of the bag to allow precise piping. Holding a strawberry by the toothpick, dip it almost completely into the white chocolate, swirling to coat evenly. Lift it out and let excess drip off.
- Create the Toothed Pattern: Hold the dipped strawberry horizontally over parchment paper. Pipe 4-5 thin parallel lines of semisweet chocolate across one side of the berry. Using a clean toothpick, gently drag it vertically down the berry across the semisweet lines multiple times. This action creates a beautiful toothed pattern as the melted chocolate pulls with the toothpick. Place the decorated strawberry on parchment paper with the pattern facing up.
- Repeat and Harden: Repeat the dipping and decorating process with the remaining strawberries. Allow the coated strawberries to stand at room temperature until the chocolate hardens, approximately 30 minutes, before serving.
Notes
- Ensure strawberries are completely dry before dipping to help chocolate adhere properly.
- Vegetable shortening helps to thin the chocolate, resulting in a smoother coating and easier piping.
- Microwave times may vary based on your appliance; always stir well to prevent overheating and burning.
- The toothpick technique creates an elegant design without extra tools.
- Store finished strawberries in a cool place but avoid refrigeration to prevent condensation from softening the chocolate.
Keywords: white chocolate strawberries, chocolate covered strawberries, holiday dessert, easy chocolate desserts, party treats