Sweetened Condensed Milk Snowballs Recipe
Introduction
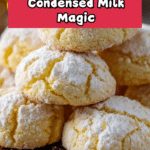
Sweetened Condensed Milk Snowballs are a no-bake holiday treat that’s creamy, chewy, and coated in powdered sugar for a festive look. Perfect for last-minute dessert needs, these delightful snowballs offer rich flavor with minimal fuss.

Ingredients
- 1 cup butter, softened
- 1/2 cup sweetened condensed milk
- 2 cups all-purpose flour
- 3 teaspoons baking powder
- 1/2 cup confectioners’ sugar
Instructions
- Step 1: In a mixing bowl, beat the softened butter until light and fluffy, about 3 minutes.
- Step 2: Gradually mix in the sweetened condensed milk, beating for 2 minutes until fully combined. If using a flavor extract, add up to 2 teaspoons now.
- Step 3: Scrape down the sides of the bowl and beat the mixture for another 1–2 minutes to ensure smooth consistency.
- Step 4: Add the all-purpose flour and baking powder to the butter mixture and beat until just incorporated. If using mix-ins like chocolate chips or dried cranberries, fold in up to 1 cup at this stage.
- Step 5: Using a cookie scoop, portion the dough into evenly sized mounds on a parchment-lined baking sheet, spacing each about 2 inches apart.
- Step 6: Preheat the oven to 320°F (160°C) and bake the cookies for 12 minutes.
- Step 7: Remove from oven and let cookies cool on the baking sheet for 5 minutes.
- Step 8: Transfer the cookies to a wire rack and generously dust them with confectioners’ sugar using a sifter.
- Step 9: Allow the cookies to cool completely before storing.
Tips & Variations
- Swap shredded coconut for crushed graham crackers if you want a nut-free option.
- Add a splash of almond or vanilla extract, or a pinch of cinnamon, to boost flavor.
- Roll the snowballs in cocoa powder or drizzle melted chocolate for a chocolate twist.
- Use dairy-free sweetened condensed milk and coconut oil to create a vegan-friendly version.
- Decorate with colored sprinkles or crushed peppermint for a festive touch.
Storage
Store the snowballs in an airtight container with parchment paper between layers in the refrigerator for up to one week to keep their soft, chewy texture. For longer storage, freeze them in a single layer, then transfer to a freezer-safe container for up to 3 months. Thaw in the refrigerator overnight or at room temperature for about an hour before serving. Enjoy chilled or slightly softened for the best taste.
How to Serve
Serve this delicious recipe with your favorite sides.
FAQs
Can I make these snowballs without baking?
This recipe involves baking at a low temperature for a short time to set the cookies, but you can experiment with no-bake versions using shredded coconut and condensed milk as a base. However, the traditional texture and shape come from baking briefly.
What mix-ins work best for these snowballs?
Popular additions include chocolate chips, dried cranberries, chopped nuts, or candy pieces. Just fold in up to 1 cup of any mix-in after adding dry ingredients to keep the texture balanced.
PrintSweetened Condensed Milk Snowballs Recipe

Sweetened Condensed Milk Snowballs are a delightful no-bake dessert that combines the creamy richness of sweetened condensed milk with the chewy texture of shredded coconut. These festive treats are lightly dusted with confectioners’ sugar, resembling little snowballs perfect for holiday celebrations or anytime you crave a quick, sweet indulgence.
- Prep Time: 15 minutes
- Cook Time: 12 minutes
- Total Time: 27 minutes
- Yield: Approximately 12 cookies 1x
- Category: Dessert
- Method: Baking
- Cuisine: American
Ingredients
Main Ingredients
- 1 cup butter, softened
- 1/2 cup sweetened condensed milk
- 2 cups all-purpose flour
- 3 teaspoons baking powder
- 1/2 cup confectioners’ sugar (for dusting)
Instructions
- Cream the Butter: In a mixing bowl, beat the softened butter until light and fluffy, about 3 minutes.
- Add Sweetened Condensed Milk: Gradually mix in the sweetened condensed milk, beating for 2 minutes until fully combined. If using an extract for flavoring, add it now, ensuring it doesn’t exceed 2 teaspoons.
- Scrape and Mix: Scrape down the sides of the bowl and beat the mixture for another 1-2 minutes to ensure smooth consistency.
- Combine Dry Ingredients: Add the flour and baking powder to the butter mixture. Beat until just incorporated. If adding mix-ins such as chocolate chips, dried cranberries, or candies, fold in up to 1 cup at this stage.
- Shape the Cookies: Using a cookie scoop, portion the dough into evenly sized mounds. Place them on a baking sheet lined with parchment paper, spacing each mound about 2 inches apart.
- Bake: Preheat the oven to 320°F (160°C) and bake the cookies for 12 minutes.
- Cool on the Pan: Remove the baking sheet from the oven and let the cookies cool on the pan for 5 minutes.
- Transfer and Dust: Carefully transfer the cookies to a wire rack. Use a sifter to generously dust the cookies with confectioners’ sugar.
- Cool Completely: Allow the cookies to cool completely before storing in an airtight container.
Notes
- Store snowballs in an airtight container with parchment paper between layers for up to one week in the refrigerator to preserve their soft texture.
- For longer storage, freeze snowballs in a single layer, then transfer to a freezer-safe container for up to 3 months. Thaw in the fridge overnight or at room temperature for about an hour before serving.
- To make nut-free or allergy-friendly, substitute shredded coconut with crushed graham crackers or cookie crumbs.
- Add vanilla or almond extract (up to 2 teaspoons) for enhanced flavor.
- Try rolling snowballs in cocoa powder, colored sprinkles, or crushed peppermint for festive variations.
- Use dairy-free condensed milk and coconut oil to make a vegan-friendly version.
Keywords: no-bake cookies, sweetened condensed milk dessert, coconut snowballs, holiday cookies, easy Christmas treats, festive desserts, powdered sugar cookies